I ran across fry bread a year or so ago. I was googling something and there it was. I love bread and I’m always looking for new types.
First I looked up its origin and history. I like to see why and where different foods originated. Unfortunately the history of this was quite sad. It dates back almost a century and a half now to Navajo culture. When they were forced off their land, they had to survive on what little the government provided them. This is where fry bread was created (to the best of my knowledge anyway).
There are many other cultures that have variations of fry bread I’m sure. These aren’t the healthiest, but they’re not the worst thing you could eat either. It’s all about moderation. Besides, live a little.
I love fry bread and how many uses it provides. I’ve made fry bread pizza, burgers, tacos, and so much more. It is a versatile and delicious bread for sure. It is also really easy to make! All you need is a little flour, salt, sugar, active dry yeast, baking powder, and water. There are many variations of fry bread recipes, this is just mine (which is a pretty solid one). I use bread flour for most of my baking, but all purpose would work just as fine here. I don’t really do the self rising flour though. So anyway, let’s get this thing started.
In a large mixing bowl combine 1/2 tspn of active dry yeast, 1/2 tspn sugar, and 1/8 cup of warm water. Whisk it all together lightly with a fork. Don’t worry too much here, it’s not gonna blend evenly. This is gonna mix in with the dough eventually to help give us a little more fluff in our fry bread. When it’s mixed enough, leave it for about 10 minutes or until it’s nice and foamy looking on top.


While you are waiting for the yeast to activate, go ahead and mix 1 1/2 cups flour, 1/2 tspn of salt, and 1/2 tspn of baking powder in a separate bowl.

When your yeast is all foamy, mix in half of the flour mix and 1/4 cup water. Get it somewhat blended then mix in the rest of the flour mix and another 1/4 of water. I just find it combines better integrating it in parts rather than all at once. But you’ll need 1/2 cup of water total regardless.
Start mixing and kneading it by hand. It’s gonna look really dry at first, but don’t worry. It takes a little while for the flour to actually absorb the water evenly. Just keep kneading and eventually your dough will get nice and smooth. When it does, form it into a ball and cover it up. I covered it with a plate, but a damp towel or plastic wrap will work fine too. Let it rest for 30 minutes.


After your 30 minutes is up, go ahead and check on your dough. It should have doubled in size.

Gently pull your ball out of the bowl and quarter it up into 4 wedges. Roll each wedge up into a loose ball and place back in the bowl. Cover them back up while you preheat a cast iron skillet over medium heat (about 10-15 minutes). They will fluff up a little more as they sit. Fill the cast iron skillet with oil about 1/2 inch deep. I used bacon grease, but lard, oil, whatever you have will work.


When your skillet is nice and hot, start working your fry bread one ball at a time. Keep the others covered so they don’t dry out. You can roll these out with a rolling pin. I like to work them by hand. It gives them a more rustic appearance.
First, give them one good smash in your palm to flatten (don’t go hulk smash though). Then starting in the center using your finger tips, gently push out while turning the dough, working your fingers out towards the edge as it stretches. You wanna be flattening it out and letting gravity stretch it as you turn it clockwise or counterclockwise (whichever direction works for you).
Be careful not to stretch a hole in it. If you do, it’s okay, just lay it flat and pinch it back together. You wanna get it about 6 inches in diameter and 1/2 inch thick or so. Before you lay it in the skillet, cut a small cross in the center. This will allow the air to escape, so you don’t end up with a fry bread loaf.

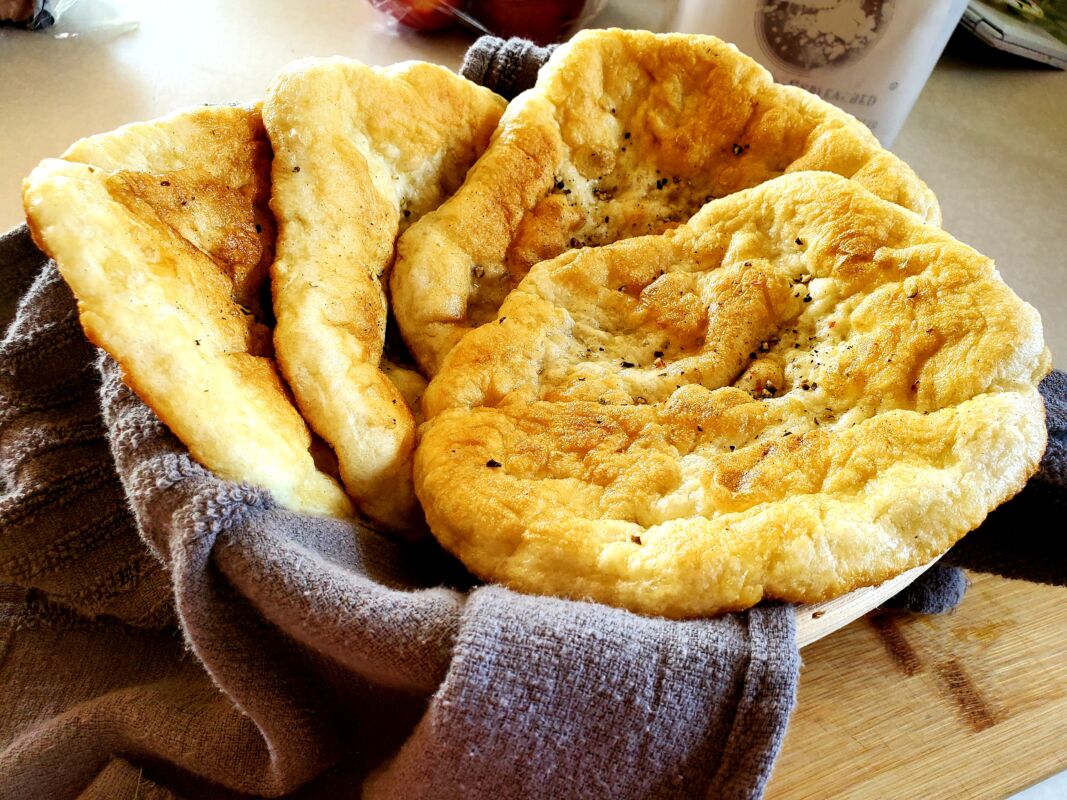
Now gently lay it in the hot oil. It should only take about 30 seconds per side (at most). Just keep an eye on the first one. When the bottom is browned, flip it over and do the same with the other side. I like to rotate it in the skillet while it’s cooking to make sure it gets toasted evenly (all cooking surfaces have hot spots). When both sides are browned nicely, remove it and let it dry on some paper towels. Do the same for the rest. You may have to add a touch more oil in between cooking, as the bread will absorb some. When they’re all done let them dry, and use another paper towel to pat dry any excess oil on top. I also crack a little pepper on there while they’re drying.


Now you can use these for burger buns, tacos, mini pizzas, sandwich slices, or just eat them like they are. I’m sure anything you choose will be delicious! The possibilities are endless. Enjoy!

Easy Skillet Fry Bread Recipe
Ingredients
- 1/2 tspn active dry yeast
- 1/2 tspn sugar
- 1/8 cup warm water for the yeast
- 1 1/2 cups flour bread or all purpose flour
- 1/2 tspn sea salt
- 1/2 tspn baking powder
- 1/2 cup warm water
Instructions
- In a large mixing bowl combine 1/2 tspn of active dry yeast, 1/2 tspn sugar, and 1/8 cup of warm water. Whisk it all together lightly with a fork. Don't worry too much here, it's not gonna blend evenly. This is gonna mix in with the dough eventually to help give us a little more fluff in our fry bread. When it's mixed enough, leave it for about 10 minutes or until it's nice and foamy looking on top.
- While you are waiting for the yeast to activate, go ahead and mix 1 1/2 cups flour, 1/2 tspn of salt, and 1/2 tspn of baking powder in a separate bowl.
- When your yeast is all foamy, mix in half of the flour mix and 1/4 cup water. Get it somewhat blended then mix in the rest of the flour mix and another 1/4 of water. I just find it combines better integrating it in parts rather than all at once. But you'll need 1/2 cup of water total regardless.
- Start mixing and kneading it by hand. It's gonna look really dry at first, but don't worry. It takes a little while for the flour to actually absorb the water evenly. Just keep kneading and eventually your dough will get nice and smooth. When it does, form it into a ball and cover it up. I covered it with a plate, but a damp towel or plastic wrap will work fine too. Let it rest for 30 minutes.
- After your 30 minutes is up, go ahead and check on your dough. It should have doubled in size.
- Gently pull your ball out of the bowl and quarter it up into 4 wedges. Roll each wedge up into a loose ball and place back in the bowl. Cover them back up while you preheat a cast iron skillet over medium heat (about 10-15 minutes). They will fluff up a little more as they sit. Fill the cast iron skillet with oil about 1/2 inch deep. I used bacon grease, but lard, oil, whatever you have will work.
- When your skillet is nice and hot, start working your fry bread one ball at a time. Keep the others covered so they don't dry out. You can roll these out with a rolling pin. I like to work them by hand. It gives them a more rustic appearance.
- First, give them one good smash in your palm to flatten (don't go hulk smash though). Then starting in the center using your finger tips, gently push out while turning the dough, working your fingers out towards the edge as it stretches. You wanna be flattening it out and letting gravity stretch it as you turn it clockwise or counterclockwise (whichever direction works for you).
- Be careful not to stretch a hole in it. If you do, it's okay, just lay it flat and pinch it back together. You wanna get it about 6 inches in diameter and 1/2 inch thick or so. Before you lay it in the skillet, cut a small cross in the center. This will allow the air to escape, so you don't end up with a fry bread loaf.
- Now gently lay it in the hot oil. It should only take about 30 seconds per side (at most). Just keep an eye on the first one. When the bottom is browned, flip it over and do the same with the other side. I like to rotate it in the skillet while it's cooking to make sure it gets toasted evenly (all cooking surfaces have hot spots). When both sides are browned nicely, remove it and let it dry on some paper towels. Do the same for the rest. You may have to add a touch more oil in between cooking, as the bread will absorb some. When they're all done let them dry, and use another paper towel to pat dry any excess oil on top. I also crack a little pepper on there while they're drying.
- Now you can use these for burger buns, tacos, mini pizzas, sandwich slices, or just eat them like they are. I'm sure anything you choose will be delicious! The possibilities are endless. Enjoy!